Soups & Salads

Wasabi Coleslaw

Today, I’m taking a familiar favourite and giving it an Asian-inspired twist:

Wasabi Coleslaw! This slaw is more than just delicious, it’s also packed with micronutrients, making it a satisfying side dish that won’t weigh you down. The creaminess of the dressing is spiked with a touch of wasabi paste, adding a delightful kick that perfectly complements the fresh crunchy veggies.

Trust me, this one’s a must-have!

Course Salads
Servings 2 – 4 persons
Preparation Time 10 minutes
Cook Time Nil

Ingredients for the Wasabi Coleslaw
(1 cup = 200 ml; 1 tbsp = 15 ml)

¼th cup Red cabbage
¼th cup Regular cabbage
¼th Red capsicum julienned
¼th Green capsicum julienned
¼th Yellow capsicum julienned
½ No. Carrot julienned
½ Green cucumber julienned
½ Green apple julienned
½ cup Spring onions, finely chopped

Ingredients for the Dressing
(1 cup = 200 ml; 1 tbsp = 15 ml)

¾th cup Mayonnaise
1 – 2 tbsp White wine vinegar
1 tsp Powdered sugar
½ cup Wasabi paste
Salt to taste
Pepper to taste

Instructions for the Salad

1 Mix all ingredients for the salad dressing in a bowl and keep aside to chill.
2 Mix the ingredients for the salad in a bowl. Add in the dressing and mix well. Garnish with spring onions and serve chilled.
Mains

Marwari Style Dahi Badas

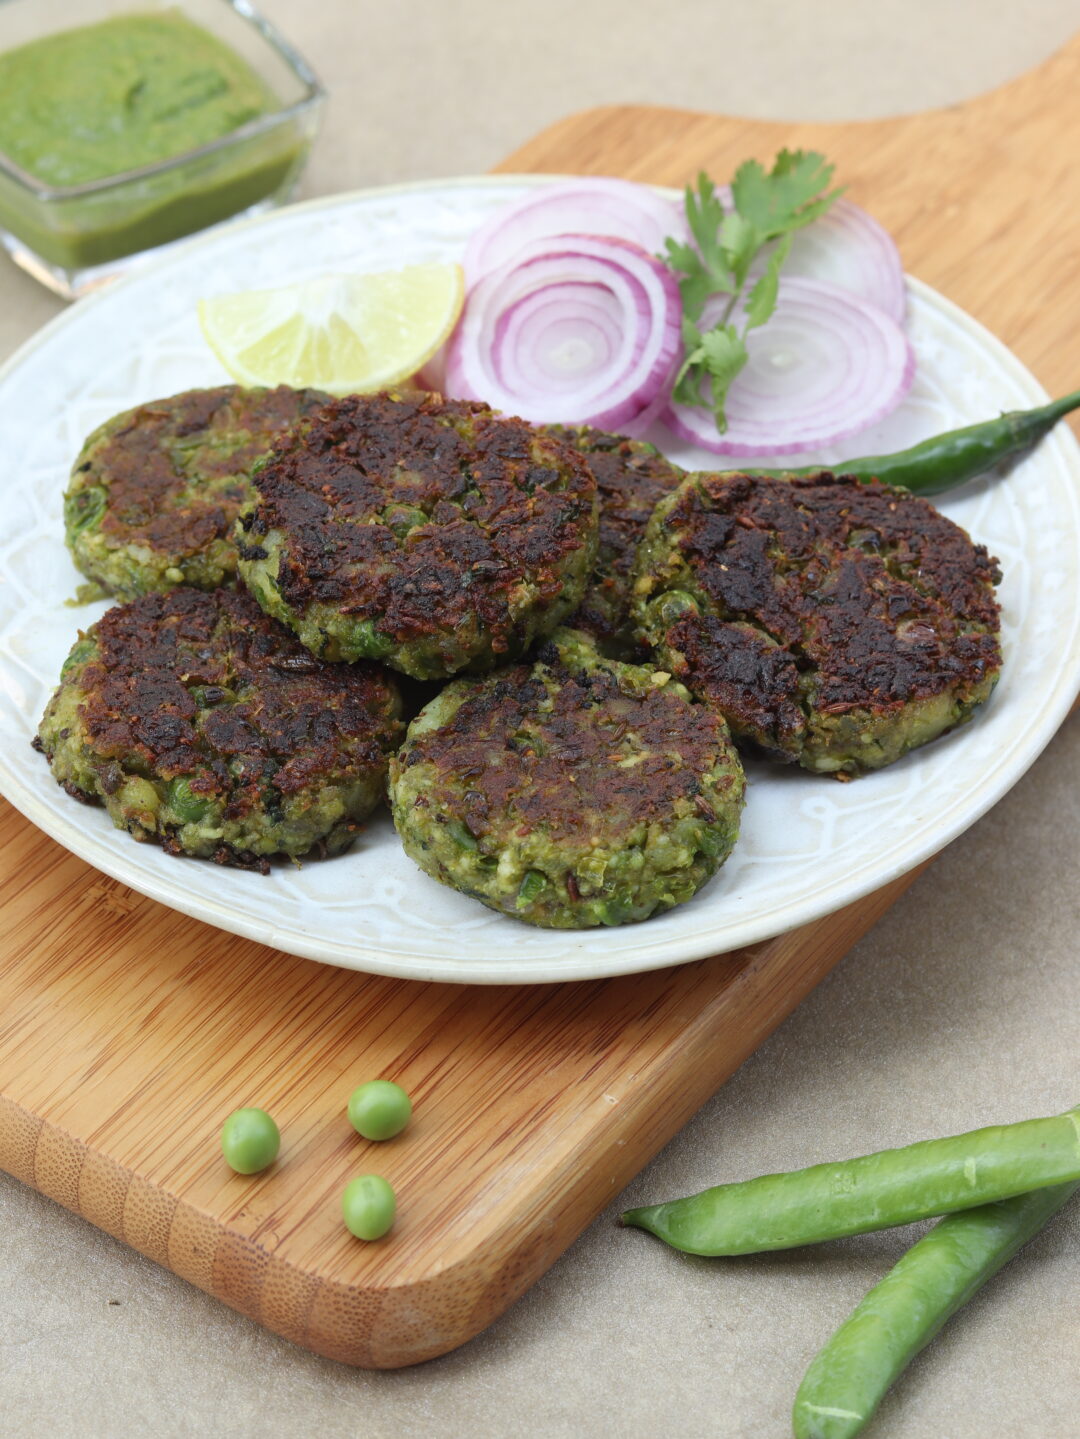
Introducing a quintessential Holi delight: Dahi Bada! Straight from the heart of Rajasthan, this dish holds a special place in Marwadi households, especially during the festive celebrations of Holi.

But what makes Dahi Bada truly stand out? As the summer heat rises, it’s the refreshing burst of flavours in every bite that steals the show. The creamy yogurt perfectly complements and balances the sweet, tangy, and salty notes, creating a delightful symphony for the taste buds.

Unlike the typical urad dal vadas, this Marwari style Dahi Bada is made with green moong, giving it a distinctive flavour and texture along with being light on the gut. So, if you’re craving something appetizing and refreshing this Holi, look no further!

Course Snacks / Main
Servings 4 persons
Preparation Time 15 minutes + 4 hours soak time
Cook Time 20 – 25 minutes

Ingredients for the Marwari Style Dahi Badas (for the Badas)
( 1 cup=200 ml, 1 tbsp=15 ml)

1 cup Green moong dal (with skin)
1 Water for soaking
2” piece Ginger
3 – 4 Green chilies
1 tbsp Coarsely ground dry red chilies
1 tbsp Aniseed (saunf), coarsely ground
1 tbsp Coriander seeds, crushed
½ tsp Hing (asafetida) powder
1 tbsp Jeera powder
½ tsp Haldi powder
1 tbsp Atta or besan
Salt to taste
Oil for frying

Ingredients for the Dahi Bada
( 1 cup=200 ml, 1 tbsp=15 ml)

1 cup Yogurt, beaten
1 tsp Sugar
Black salt to taste
Salt to taste
1 tsp Red chili powder
1 tsp Jeera powder
1 tbsp Imli chutney
1 tbsp Green chutney
Green coriander leaves to garnish

Instructions for the Badas

1 Rinse the dal well 3 – 4 times. Soak in water for 4 hours. After 4 hours, remove the green skin of the dal. Drain the water completely.
2 Add in the green chili and ginger and coarsely grind the dal. (It should have a rawa like consistency).
3 In a bowl, take the ground dal paste; add in the masalas mentioned along with either atta or besan.
4 Heat the oil in a kadhai. Now tie a muslin cloth tightly on a katori or steel glass. Wet your fingers and take about 1 tbsp paste and spread on the muslin cloth. Loosen the cloth and invert the dal paste on your hand and slowly slip it in hot oil. Fry the badas one at a time. They should fluff up in the centre. Fry until golden brown. Keep aside. Immerse them in a bowl of water to soften for 1 hour.
5 Now, for the yogurt mixture, add in sugar and whisk well. Ad in salt, black salt, jeera and red chili powder. Now remove the badas form the water, squeeze completely. Immerse them in yogurt mixture and chill for at least ½ hour. This helps badas to soak the yogurt mixture.
6 Before serving arrange them on a plate. Add more beaten yogurt on top. Add 1 tbsp thin imli chutney, 1 tbsp thin green chutney. Sprinkle with salt, jeera, red chili powder. Garnish with coriander leaves. Serve chilled.

Notes:
1. Do not add water whilst grinding the dal. If the dal becomes too soft during grinding, add more besan and add ½ tbsp. cold ghee to it.

2. Before frying add 1 tbsp hot oil to bada mixture. It helps soften the badas.

3. Roll out thin badas on the muslin cloth. Be careful before sliding into hot oil. As the water and oil may result in bubbles.

Mains

Maharashtrian Pithla

Happy Gudi Padwa!💫On this auspicious occasion, I decided to whip up this classic recipe that has stood the test of time: ‘Pitla’. It is a curry made with besan (gram flour), a spicy base of ginger-garlic-green chillies, and onions. This hearty and uniquely flavorful dish can be prepared without much hassle, and to relish it in the best way, pair it with Bhakris!

Here’s what you need to prepare this:

Course Main
Servings 2-4 persons
Preparation Time 5  minutes
Cook Time 10- 12 minutes

Instructions for the Maharashtrian Pithla
(1 cup = 200 ml; 1 tbsp = 15 ml)

1 cup Besan (gram flour)
1 Onion, minced
2 – 3 Green chilies, minced
5 – 6 Cloves of garlic, minced
1 tsp Turmeric powder
2 tbsp Oil
1 tbsp Mustard seeds
A few Curry leaves
1 tbsp Green chili paste
1 tbsp Garlic paste
1 – 2 Whole red chilies
Salt to taste
1 No. Sour yogurt
½ cup Lemon juice
3 – 4 cups Water
 2 – 3 tbsp Chopped coriander leaves for garnish

Ingredients for  Maharashtrian Pithla

1. Whisk the besan with 2 cups of water. Stir well to avoid lump formation.
2. Heat oil in a kadhai. Splutter mustard seeds, curry leaves. Sauté the ginger, onion and garlic. Sauté for 1 – 2 minutes. Add in the garlic and green chili pastes and sauté until raw smell disappears. Add in the turmeric powder and mix.
3. Lower the flame. Add the gram flour water mixture. Stir continuously and keep cooking. The gram flour mixture should be bubbling.
4. After 3 – 4 minutes, add the yogurt whisked with the remaining water.
5. Cook on a low flame continuously until the gram flour is cooked properly, add in salt and lemon juice. Taste and adjust seasoning. The consistency of this pitla is semi solid (I do not prefer it to be completely brown and dry).
6. Lastly garnish with coriander leaves and serve immediately. You can add a tadka of whole red chilies, chopped garlic and ginger on top before serving. Best enjoyed with jowar bhakris.
Mains

Khamang Kakdi Koshimbir

Who can say ‘no’ to a refreshing bowl of ‘Khamang Kakdi Koshimbir’? Offering a delightful respite from the heat, this salad cools your body, making it an impeccable choice for the scorching summers. In a bowl, combine all the ingredients except for ghee, mustard seeds, and neem leaves. Mix well and adjust the seasoning to taste. (Ingredients listed below)

But here’s the twist – or should I say, the ‘tadka’? In a pan, heat the ghee and sauté the mustard seeds and neem leaves until fragrant. Pour the aromatic mixture over the salad and give it a final mix. Garnish with fresh coriander leaves and serve chilled. This salad is so delicious that one bowl is simply not enough!

Course Main
Servings 2 persons
Preparation Time 5 minutes
Cook Time Nil

Instructions for the Khamang Kakdi Koshimbir
(1 cup = 200 ml; 1 tbsp = 15 ml)

1 cup Grated cucumber
2 – 3 Green chilies, minced
½ cup Grated coconut
¼ cup Roasted peanuts, crushed
1½ cups Yogurt beaten
¼ cup Coriander leaves
½” pc Ginger, minced
1 tbsp Ghee
1 tsp Mustard seeds
A few Neem leaves
Salt to taste

Ingredients for the Khamang Kakdi Koshimbir

1. Take all the ingredients except ghee, mustard seeds and neem leaves in a bowl. Mix well. Taste and adjust seasoning.
2. Heat ghee in a tadka pan. Sauté mustard seeds and neem leaves. Add to the above mixture. Mix well. Garnish with coriander leaves and serve chilled.
Appetizers

Matar Paneer Tikki

A must-try recipe before the fresh matar (peas) season ends! 🫛

If you’re a fan of tikkis like me, you’ll adore this low-cal ‘Matar Paneer Tikki.’

Packed with protein and bursting with flavour, these tikkis are simply irresistible – you won’t be able to stop at just one.

To get started all you need is shredded paneer, mashed peas, ghee, and a selection of spices (the complete list can be found below). These tikkis are perfect as appetizers and are easy to prepare.

Check out how to whip up this delicious treat:

Course Appetizer
Servings 2
Preparation Time 10 minutes
Cook Time 15 minutes

 Instruction for the Matar Paneer Tikkis:

1 cup Matar fresh peas crushed coarsely
¼th cup Paneer cottage cheese grated
2 tbsp Boiled potato mashed
2 Nos. Onion minced
½ cup Green chilies minced
½ cup Cumin seeds
2 tbsp Ghee
A few drops of Jeera Powder
2 tbsp Garam Masala Powder
8 – 10 large Chaat Masala
Salt to taste
Lemon juice as per taste
1 – 2 tbsp Corriander leaves finely chopped

Instructions for the Spaghetti Fernandes

1. Heat 1 tbsp ghee in a pan. Splutter the cumin seeds for 1 minute. Saute the onion & green chili for 1-2 minutes
2. Add in coarsely ground fresh peas (raw, not boiled) and cook for 2-3 minutes. Add in the grated paneer and mashed boiled potato.
 3. Add in the jeera powder, chaat masala, salt, garam masala & lemon rice. Taste and adjust the seasonings. Add in coriander leaves and remove from flame.
4. Once boiled shape into tikkis. Heat a nonstick pan and lightly shallow fry the tikkis with 1 tbsp ghee.

Serve hot with chutney

Appetizers

Cherry Tomato & Orange Crostini

Introducing my go to summer-time party appetizer: Cherry Tomato & Orange Crostini.
With Holi celebrations just around the corner, these little toasts make the perfect party appetizer and hey! it’s not only delicious but surprisingly healthy too.

Each bite is a symphony of flavours – from the tanginess of cherry tomatoes to the zesty kick of orange, complemented by cream cheese and topped with fresh basil and balsamic glaze, this appetizer will leave you craving for more!

Want to try this recipe? Here’s how you prepare it:

Course Appetizer
Servings 4 persons
Preparation Time 10 minutes
Cook Time 10 minutes

Ingredients for the Cherry Tomato & Orange Crostini
( 1 cup=200 ml, 1 tbsp=15 ml)

8 – 10 slices Of French baguette
2 – 3 tbsp Olive oil
2 – 3 tbsp Fresh orange juice
½ cup Yellow cherry tomatoes
½ cup Red cherry tomatoes
½ cup Fresh orange segments (peeled)
3 – 4 tbsp Philadelphia cream cheese
6 – 8 Basil leaves, shredded
Salt to taste
Fresh pepper to taste
Balsamic glaze

 Instruction for the Cherry Tomato & Orange Crostini

1. Brush the baguette slices lightly with a little olive oil and toast in a preheated oven @ 180℃ until crisp.
2. Meanwhile, in a bowl, add the chilled orange segments, chilled cherry tomatoes red and yellow, olive oil, basil leaves, chilled orange juice, salt and pepper.
3. Spread the cream cheese on the toasted baguette slices. Add 1 tbsp of the mixture on the baguette. Drizzle with balsamic glaze and serve at once.

Note: Please use chilled ingredients for the above crostini. It gives a very refreshing flavour.

Appetizers

Fig & Brie Crostini

One thing I’ve learned is that great appetizers don’t have to be complicated. It’s not about the hours you put in; it’s about using the right ingredients that marry well together.

Take this latest recipe, Fig & Brie Crostini, for example. With just 10 minutes of prep time, it’s an absolute delight! But beware, once you try it, you’ll find it hard to resist. The combination of sweet figs, creamy brie cheese, and the satisfying crunch of crispy crostini is a flavour explosion like no other. And let’s not forget the perfect touch of honey caramelized with the blow torch, this perfection will have you drooling and craving for more. So, without further ado, here’s how you can make it.

Course Appetizer
Servings 4 persons
Preparation Time 10 minutes
Cook Time 10 minutes

Ingredients for the Fig & Brie Crostini
( 1 cup=200 ml, 1 tbsp=15 ml)

8 slices Baguette bread
3 – 4 Fresh figs, sliced
1 small wheel Brie Cheese
A few Rocket leaves
2 – 3 tbsp Honey
1 tsp Chili flakes
Olive oil for brushing

Instructions for the Fig & Brie Crostini

1. Brush the baguette slices with olive oil. Heat in a preheated oven @ 180℃ until slightly toasted.
2. Cut the brie cheese into slices. Place over the toasted baguette and heat in oven for

4 – 5 minutes until its warm.

3. Add a rocket leaf on top and add a fresh fig slice. Drizzle with honey and chili flakes. You can grill the baguette under the grill or alternatively, use a blow torch until the honey caramelizes a bit.
4. Serve at once.
Mains

Fariyali Quinoa Khichdi

Usually a common recipe in my house during any fast like Shivratri, Ekadashi or Navratri was the ever popular Sabudhana Khichdi. But tapioca being high in starch known to cause weight gain, I switched this option to the highly nutritious super protein rich grain “Quinoa”. This recipe is super easy to make and doesn’t call for long or overnight soaking hours. This fast friendly version has just potatoes. However, on normal days, we can sauté the same with garlic, turmeric and add in a variety of other vegetables. Serve it with green chutney and voila, a complete gut-friendly protein-rich meal is ready to be relished during your fasting days.

Course Main
Servings 2 – 4 persons
Preparation Time 15 minutes
Cook Time 20 minutes

Ingredients for Fariyali Quinoa Khichdi
(1 cup = 200 ml; 1 tbsp = 15 ml)

1 cup Quinoa
2 nos Boiled potatoes, peeled and cubed
½ cup Peanuts, roasted and crushed
3 – 4 Green chilies, minced
2 – 3 tbsp Ghee
1 tbsp Cumin seeds
1 tbsp Sugar
1 no. Juice of 1 lemon
Sendha namak / rock salt to taste
2 – 3 tbsp Coriander leaves

Instructions for the Fariyali Quinoa Khichdi

1. Wash the quinoa in water (3 – 4 times) and drain. Boil the quinoa in 3 – 4 cups of water. Once cooked, drain and dry on a tea towel. Keep aside for further use.
2. Heat ghee in a pan. Sauté the cumin seeds for 1 minute. Next, add the green chilies and let it splutter. Cook for 1 minute.
3. Add in the diced potatoes and cook for 1 minute. Next add in the cooked quinoa. Add in the roasted crushed peanuts, lime juice, salt and sugar. Mix well. Taste and adjust the sugar, lemon, salt quantities. Finally, add in the coriander leaves and serve at once.


Condiments

Fresh Turmeric & Ginger Pickle

Fresh turmeric pickle or kacchi haldi ka achar as we call it, is a winter special pickle which carries umpteen health benefits. This pickle is made only when the ingredients are in season which is the winter season. Pickle or achar is known to be good for our gut bacteria too.  This pickle sans oil and salt is the perfect recipe for all your health concerns. So hurry and make this before the winter season ends and enjoy its flavour and benefits all throughout the year.

Course Condiment
Servings Makes 1 small jar
Preparation Time 10 minutes
Cook Time Nil

Ingredients for the Fresh Turmeric & Ginger Pickle
(1 cup = 200 ml; 1 tbsp = 15 ml)

1 cup Peeled and julienned fresh turmeric
1 cup Peeled and julienned tender ginger
¼th cup Sliced green chilie
1 No. Lemon juice

Instructions for the Fresh Turmeric & Ginger Pickle

1. Mix all ingredients in a clean airtight glass jar. Shake well. Leave to dry in a cool place for 4 – 5 hours for flavors to blend in.
2. Refrigerate the pickle in the same glass jar. It stays fresh up to 6 – 8 months when refrigerated.
Desserts

Strawberry Biscoff Sandesh Cake

Get ready to dive into dessert heaven with our Lotus Biscoff Sandesh topped with juicy strawberries! Picture this: creamy Sandesh infused with the rich, caramelized goodness of Lotus Biscoff, and then BAM! Fresh strawberries on top for that burst of fruity bliss. It’s like a party in your mouth that you won’t want to end! Don’t miss out on this sweet fusion sensation!

Course Dessert
Servings 4 – 6 persons
Preparation Time 15 – 20 minutes
Cook Time 15 – 20 minutes

Ingredients for the Strawberry Biscoff Sandesh Cake

(1 cup=200 ml, 1 tbsp=15 ml)

1 litre Full fat milk
A few drops of Lemon
1 cup Almonds whole
4 – 5 tbsp Powdered sugar
A few drops of Almond essence
2½ cups Fresh strawberries cut into small pieces
1 packet Lotus Biscoff biscuit
1 – 2 tbsp Unsalted butter
Biscoff spread to drizzle
Pistachios for garnish

Instructions for the Strawberry Biscoff Sandesh Cake

1. Crush the biscuits with a rolling pin. Add about 2 tbsp softened butter in the crushed biscuits – mix well. Pour into a greased 9-inch spring form pan with medium pressure using your hand, pat the mixture down in the bottom. Set in fridge to cool.
2. Heat the milk; bring to a boil. Add the lemon drops and let the milk curdle. Collect the soft chenna. Rinse it well (4 – 5 times) under water. Squeeze it. Drain completely. Mash well with your palms. Keep aside.
3. Soak the almonds overnight. Next morning drain, remove their skin and grind to a coarse paste.
4. Mix the almond paste, chenna, powdered sugar (3 – 4 tbsp), 1 cup chopped strawberries and the almond essence. Mix well. Set this mixture over the biscuit base. Keep in fridge to cool for 1 – 2 hours.
5. Mix the remaining sugar with the balance strawberries. Once the Sandesh cake is cooled (after 1 hour) spread the strawberries over the Sandesh cake. Drizzle / pipe biscoff spread over the strawberries. Garnish with pistachios and serve cold.